Fabric Forms for Scarf Valances

Light and absolute or stately and fluid, scarf valances add decorative flair to your windows. You can create your own valance from a 6- to 8-yard period of material. If the cloth is non-raveling, simply cut a straight edge at the narrow ends. Otherwise, sew narrow hems or trim with pinking shears to prevent raveling. Many lightweight fabrics arrive in artificial or natural-fiber versions, offering a range of price points and care choices for the look you want.

Light and Sheer

Sheer fabrics allow light to pass through and soften the look of your window treatment. Organza and chiffon are the most popular sheers for window scarves and match almost any style window or room. Lightweight gauze is casual and beachy, evoking the sense of a seaside cottage. Cotton voile in a delicate floral print complements shabby-chic style decor; delicate lace yardage is an alternative for feminine decor styles.

Opaque and one of a kind

Elegant wool challis, frequently used in fine men’s suits, lends a stately effect for formal rooms. Charmeuse, crepe and destroyed velvets feel wealthy and luxurious, whilst batiste and chambray suit casual, country styles. If you want a bold, boho or ethnic-fusion look, try silk sari cloth or rayon challis in bright colors and ethnic-style prints.

See related

How to Mix Old Kitchen Cabinets With New Kitchen Cabinets

Mixing a couple of new kitchen cabinets in with the old supplies much-needed storage space, but might leave the kitchen looking mismatched and bare. Rather than settling for function over fashion, blend features of the old and new cabinets, altering every slightly so they look as though they belong together. Paint colour, cabinet-door style and hardware are several techniques to bring about a cohesive appearance and prevent the cabinets by clashing.

Size Matters

If the cabinets sit alongside one another, especially ground closets, the new cabinets ought to be exactly the exact same size as the old to be viewed as a cohesive unit — differently this section of the space might look distinctively awkward. A cabinet or cupboard category that is not intended to join the old cabinets, such as one unit above a fridge, does not need to match the present cabinets in size; instead, pick a size suitable for the space.

Color Coordination

New cabinets vastly different in colour from the originals might appear out of place from the kitchen. Make the new and old meld together visually during the end. If you prefer the color of the new cabinets over the old, paint the old to match the new. If the old cabinets are a natural wood colour and the brand new are painted, then add a veneer or faux finish to the brand new cabinets with glazes to emulate exactly the identical wood grain and color, or hire a professional painter to achieve that. In some cases, varied colors include an eclectic, warm appearance to the kitchen. If the new cabinets have been a espresso tone and the old look more like caramel, they can work together if the furniture or other ornamental elements in the kitchen contain the exact same dark brown colour. The outcome is a layering of colors, much like choosing furniture in different shades for a living room.

Cohesive Countertops

Even if the new flooring cabinets appear slightly different compared to the old, connect them visually by selecting a brand new countertop that matches the old one. When the new cabinets sit far enough away from the aged, a somewhat different type of countertop might suffice, as long as the color is rather similar. As an example, if the existing kitchen countertops are a gray granite, a grey mixture countertop that appears somewhat like granite blends in nicely.

Handle It With Hardware

Simple as it appears, the hardware on the cabinets — out of hinges to grips and pulls — creates a sense of cohesiveness in the kitchen. Install hardware about the brand new cabinets that matches the old to get an instantaneous transformation that makes it look as though the cabinets were intended to be together. Replace all of the cupboard hardware if you want to have an entirely new style for all of the cabinets. In case the newest cabinet hardware appears like the old already, except in colour, paint the hardware to match the old.

Decorative Details

Decorative embellishments also tie the new and old cabinets together visually. Use beadboard on the exposed sides of cabinets — new and old — to get a second transformation. Add trim to brand new doorways to make them fit the manner of the aged, or eliminate cabinet doors completely on a number of the new and old cabinets to get an open appearance. In open or glass-fronted cabinets, add patterned fabric to the inside back of this space to get a cohesive touch of decor.

See related

Privacy Options for Sliding Doors

Choose a remedy for your own sliding glass doors with a privacy level that fits together with the way you live. From light-filtering sheers to opaque draperies, slider treatments are intended to suit varied privacy needs and needs. If you prefer solitude that’s coupled with an unobstructed view of the outside, install a one-way-view slider covering which permits you to see out, but blocks others from prying indoors.

Install Blinds

Vertical blinds function with one control that rotates the slats and another device that slides the whole blind shut or open, letting you change the privacy level in your home. Alternately, panel-track blinds hang against your sliding glass door in big flat-panel sections which glide back-and-forth in channels to attractively cover as much of this sliding door as you desire. Vertical cellular shades provide a double vertical door covering option. They’re constructed with a honeycomb-shaped substance that’s typically semi-transparent.

Select the ideal Fabrics

Draperies include a soft texture to your own room and a vast range of privacy levels. For partial solitude, choose loose-weave or sheer fabric drapes which allow light to permeate the material. Heavyweight fabrics, like tapestry, velvet or suede, provide a more opaque barrier between your slider and the world outside. Choose lined drapes in a thick fabric to create black-out conditions, which is ideal if you want to sleep during the daytime.

Apply Tinted Film

Not just is window film available in a huge array of transparency levels, but you can cut it to match any sliding glass door. Silver, mirror-like films impart a one-time view in the interior of the home to the outside, supplying a good deal of solitude. Light-tinted window movies impair outsiders from seeing clearly within your home and lower the sunlight’s intensity from streaming inside. Decorative window film in various designs give you the scale of solitude you desire, while incorporating a layout flair to the room.

Produce Layers

By layering two or more treatments to your sliders, you can readily alter the privacy level inside your home. For example, when you install black-out drapes over sheer curtains, you may produce partial solitude by pulling open the drapes to a side and leaving the sheers intact to cover the sliding doors. For a frequently used sliding door, then apply tinted window film in lieu of this sheers for simple in-and-out access. Hang natural-woven blinds on your own tinted sliders for an earthy semi-translucent covering.

See related

The Way to Shape and Identify Stemware Size

That does not answer the question of that stemware to use for what purpose, although the definition of stemware is any stemmed beverage glass. A stemmed glass for a tall flute for sparkling wines, one for white wines are but you can always add.

Broad Round Bowls

It is intended to hold red wines In case a glass includes a bowl on a stem that was long. The opening is larger to accommodate the nose and also to allow more air to circulate at the glass. The exception is that the classic Bordeaux glass. It is somewhat more narrow than the Burgundy glasses, to get a wine glass that is generic-type. As the name indicates — another style for red wines would be that the balloon, it looks like a round glass ball on a stem.

U-Shaped Bowls

It is intended to serve wines, if a glass includes a taller bowl. The fundamental white wine glass looks like that the Bordeaux, only slimmer and somewhat smaller. The shape aids enhance the flavors and aromas of a chilled white. A wine glass that is narrow at the base and flares before narrowing below the rim is really a Sauternes. It is designed specifically for sweet whites, but can be used for almost any dessert wine.

Tall and Thin

Long thin flute-shaped stemware is designed for sparkling wines and champagne. The shape keeps more of the fizz of this wine, creates a display of perpendicular bubbles and keeps the drink cooler. A wide, shallow coupe glass can also be intended for sparkling wine, but they’ve become popular because they allow the bubbles to dissipate along with the drink to warm too quickly, and increase the chance of spills.

Other Stemmed Glasses

In the dessert wine glasses that look like smaller versions of the brothers that are dinnertime, to the curvy Madiera glass, there are more stemmed types of glassware. One of the more common are the martini glass, that resembles an inverted pyramid on a stem, along with the broad, bowl-like margarita glass. Other stemmed barware comprises the V-shaped sherry glass, miniature glasses, along with also the balloon-shaped brandy snifter.

See related

Kinds of Textures

Wall color greatly influences the ambiance in a room, but so does feel — the visual and tactile”feel” of their walls. You can not escape feel leaving the walls smooth is a feel decision — so you may also exercise your creativity and have some fun executing and planning your own design. You paint to create your walls dramatic or subtle as you desire, or can use drywall mud, texturing compound.

Smooth to Mottled and Beyond

The wall texture is referred to as a skim coating; smooth it with a drywall knife, trowel marginally diluted joint compound on the wall and to make it. It requires two or three coats to get a level-5 drywall finish, that’s the smoothest there is, and the scraping requires some skill. A single application provides the base for a few mottling techniques that are easy . Run over it with a medium-nap paint roller to generate an finish or create a blueprint by stamping onto a pattern using a cookie cutter or swirling mud away at strategic places.

Wild and Crazy

Particular texture patterns are helpful for hiding taped joints; from analyzing anything in 27, while discouraging the eye, they add mass. Once skim-coating the wall, it is possible to make among the most usual random patterns using a slap brush, which can be a big brush onto a pole. Slapping the brush to the stiffened mud creates a stippled pattern. Another method that makes a random feel is to spray globs of sand and put them. This is referred to as a knockdown texture.

The Artistic Approach

Should you regard your walls a tabula rasa for your urges, then you might like troweling sand thickly and sweeping over it using a drywall knife to make discrete lines, ridges, waves and islands. This system is referred to as hawk and trowel — that the hawk is and it is certain to leave your signature. You may refine the plan by pivoting a cone knife on one of its corners to make semicircles or drawing on on a comb over the fresh mud to make swirls.

Visual and Subtle

Feel is added by some designers . After painting a base colour and allow it dry, you are able to apply addition color with a fabric that is bunched-up or a cellulose sponge, or even by tapping a paintbrush within the wall. Feel is added by clay paint by virtue of its weight and sheen, and you can enhance its simplicity that is earthy . Skim coat the sand and, create small imperfections in it using a stone, before it is too dry to mark. A coat of primer and clay paint will make it look like adobe.

See related

What Kind of Paint Color Goes Good With Navy Bedding?

Color expert Max Luscher saysin”The Luscher Color Test,” that dark blue is related to peace, making navy bedding an suitable colour for a calm and tranquil area. Comparison is provided by a tone on the walls and keeps the room from feeling dark and closed-in because navy is deep. As a neutral, navy enhances a number of palettes. Choose your paint color to complement your navy bedclothes dependent on the dimensions of your individual preferences, the style of the furnishings and the space.

Keep It Simple

All white walls and woodwork balance navy bedding’s color. A high-gloss white enamel over the trim increases reflected light, as does an effective combination in a room that was smaller, a ceiling. White cloth and printed navy on drapes and cushions helps the color scheme. White furniture increases the impact and the soul of the space, or you’ll be able to introduce a third accent color through painted furniture. By way of example, accentuate the navy with a red rocking chair, a trunk that is green or chartreuse bedside tables.

Natural Neutrals

Navy that is neutral and other neutrals for a color scheme combine. They key is to keep the companion colors mild in tone, like khaki tan or camel walls. Pale walls in combination with navy create a cool, silent effect. Throw window treatments and pillows support and complement the scheme created walls and by bed. Employing the colour of the wall color on the ceiling subtly aids the colors in the area link. To call attention utilize a paler tint of the wall color to create a contrast that is slight.

Monochromatic Magic

A color scheme utilizes tints of a single color. Navy blue may seem to have a violet tone or a tint that is deep, so start. Pale tints of the navy bedding color on the walls help create a area. The ceiling and woodwork might be painted to match a wider tint of the wall color or the walls. Painting a navy accent wall behind the bed is possible in the event the room size is ample and helps produce a more”built-in” effect.

Intelligent Ideas

Navy personality allows it and contemporary colors like lime green, gold or even an orange-red to blend. The amount of bright color must be limited to keep it from getting overwhelming. Painting one wall the accent color and the walls that are remaining white generates an exciting space with trendy verve, a place.

See related

7 Strategies to Create a Snug Kids' Hideaway in Home

Creating a quiet place just for your kid isn’t nearly corralling toys and sound. Quiet places that children can call their own are spaces that they can control in a world that’s run by adults. All these sanctuaries, protected from the outside world, provide children the opportunity to reflect and be creative, psychological and, perhaps most important, alone.

The big question is, how much is too much solitude? How can we help our children establish liberty while we still keep a watchful eye? Listed below are seven wonderful ways to create a sanctuary for your kid which do not need shutting the door.

Jute Interior Design

1. Insert a tepee. Much like blanket forts, tepees are a wonderful addition to just about any playspace. Store-bought or home made versions can fit any environment and won’t break the bank. Pull together some twine, cupboard dowels and a bedsheet to create a home made refuge in just a few minutes.

Benedict August

2. Take a seat. Window chairs aren’t just for adults. These comfy seats are a fantastic opportunity for a kid to grab just a little solitude in a bustling home.

Visbeen Architects

3. Establish a landing. Built-ins are fine but not required here. Take advantage of that space near the stairs using a kid-size play place or seating arrangement. This tiny space is the perfect spot for a child’s quiet conversations, artistic endeavors or perhaps homework time.

4. Go lofty. Space-saving loft beds help a kid to get over the fray. They make the most of top-bunk solitude, and also the space below can easily serve as a drama, lounge or assignments area.

Lobalzo Design Associates, Ltd

5. Create tiny nooks for drama. Make a big statement in a very small area. Take advantage of an unused cupboard or a room under the stairs to create an intimate setting for your little one.

Tracey English/One Apple Designs

6. Create a cozy corner. Whether drama is quiet and reflective or lively and boisterous, child-size comfy corners are spots in which the activity can occur without getting in the way of principal living spaces. Simply angle bookshelves or furniture pieces from a wall and add some floor cushions or beanbags.

Home Staging

7. Cover with a duplex. A canopy above a child’s bed may create solitude and an instant sanctuary. You can buy canopies at many shops, but you may also make your own by suspending cloth from curtain rods or pipes over the bed.

Your turn: Please show us your creative children’ escape area in the Comments!

More: Designer’s Touch: 10 Imaginative Kids’ Rooms

See related

How to Whitewash Cupboards

In a classic, shabby-chic or nation kitchen, whitewashed cupboards provide the finishing touch which sets your decoration in the period. Whitewash allows some of the natural grain to show through, providing the cupboards an authentic weathered look of the wood. Contemporary recipes do not include lime due to its caustic properties although whitewash is constructed of salt and lime. The paint you use does not need to be white, either the word”whitewash” can reference the painting technique, in place of the paint colour, so feel free to mix in different colors if desired.

Spread dropcloths on your work area. Unscrew the cabinet doors, and remove of the hardware, like hinges, hinges and handles. So that you know where one to place it back 16, label each door and hardware item.

Using a household cleaner and a cloth you plan clean of the surfaces of the cupboards. Rinse them and allow them to dry.

Strip any prior finish off or varnish employing an agent. Choose a agent according to what kind of finish or varnish you’re removing. Test several varieties if you do not understand what kind of stripper you need. The stripper using a cloth or brush, allow it to sit for the duration of time then scrape or wipe it off. Follow the instructions on the stripper’s label to ensure you’re using the product.

Sand the cupboards’ surfaces with a power sander equipped with sandpaper. Wipe the wood with a damp cloth to remove the dust.

On the cupboards in thin layers using a flat, wide brush paint the whitewash. To get a even coating, apply the whitewash along the direction of the grain; to get a less even desperate look, use it against the grain. Painting over any screw holesimmediately wash paint with a pipe cleaner. Allow the paint to dry.

Apply a second and third coat of whitewash if wanted, again cleaning the screw holes as you move. Allow the paint to dry completely. Sand it by hand with fine-grit sandpaper to smooth the outside out; to distress it further, sand the paint off on the corners and also in different areas according to a artistic preference.

Paint on a sealant to protect the whitewash and keep it smooth and clean. Allow the sealant to dry and cure according to the specifications on the label of the product.

Reassemble your cupboards.

See related

Spanish-Style Interior Home Design

The popular Spanish revival design theme originated at the turn of the 20th century through World War II, also gained fame with house builders in California, Florida and Texas. In an interview with CNN, California property agent Gerri Cragnotti said Spanish style continues to command the attention of buyers and a higher sale price, which makes it both a smart and sophisticated design choice when preparing your house for the resale market.

Walls & Ceilings

Spanish-style inside walls are usually completed with a smooth-touch stucco texture or a faux end –a paint method in which brush strokes, sponge patterns or varying colors of the same color are used to add measurement. Typical colors include Mediterranean-influenced warm and cool colors and earth tones such as taupe, burnt orange, chocolate brown, indigo blue, deep red and mustard yellow. Many conventional Spanish-style interiors have wood-framed windows and carved panels and ceilings decorated with wood beams and decorative tin tiles or made entirely of wood.

Flooring

Fully spaces are uncommon in interiors. Ordinarily, a uniform flooring surface is installed throughout the house and highlighted with area rugs and throw rugs. Spanish rugs have a knotted weave in staggered rows. Off-white or A beige generates a backdrop for linear-patterned layouts in yellows and soft greens. The most traditional flooring choice in a Spanish-style house is hardwood, though budget-conscious designers can select alternative flooring choices such as slate, a heavy, matte-finished ceramic or terracotta tile with black grout.

Accessories

Accessories include fabrics, wrought pottery and iron. Fabrics can be incorporated into the style with cotton throw rugs and window treatments made from cotton in muted colours. Wrought-iron sticks can be used to hang window treatments. To integrate more wrought iron in your design strategy, use an assortment of decorative pieces such as door knockers, cabinetry and door components, wall sconces, chandeliers, headboards and fireplace covers. Little groupings of massive and pottery vases, random add no-fuss styling.

Furniture

Spanish-style homes often have Mission-style and leather black wood furnishings. Some wood choices that are common include teak, walnut, ebony, butternut, walnut, cherry and rosewood. Conventional furniture provides a complementary contrast to some Spanish-style house’s soft arches and whimsical architectural components such as stained wood panels. Choose leather armchairs with straight backs, heavy wooden benches and wood chairs upholstered in woven cotton fabrics.

Veranda and Patio

A key part of interior design that is Spanish-style is the integration with the outdoor veranda and patio of the home. Floor plans open toward spacious outdoor dining and sitting areas. In some cases, a room’s walls are extended to include an outdoor spaceFrench doors and archways result in outdoor areas, adding visual interest and allowing natural light to saturate the room. These outdoor spaces, meant to be lived-in extensions of the home, bring a chance to decorate with wicker or wood furniture and accessories such as colorful pillows and wrought-iron wall sconces or a fire pit. Pottery can be used to plant greenery.

See related

Happy Birthday, Marilyn Monroe

I challenge you to think of somebody’s image that’s captivated us affected and ingrained itself into our house decor over that of Marilyn Monroe, who would have celebrated her 87th birthday today, June 1, 2013. (Monroe died in 1962 from a prescription pill overdose.) My own wife has gathered a small collection of posters, expensively framed prints, coffee table books and even Marilyn Monroe wine.

But few people know or have observed that the impact of Monroe’s image and life over Greg Schreiner, the president and founder of her fan club, which he started 31 decades back. He has been analyzing Monroe’s life because he first saw her face splashed on the silver screen in 1960. “As a child, my parents took me to see Some Like It Sexy,” he states. “I couldn’t get the image from my brain. I was 8 years old. I was 10 when she died.”

Each June 1 Schreiner celebrates Monroe using a guided trip around her older Los Angeles haunts plus a free-to-everyone celebration at Schreiner’s house, which, of course, is full of Monroe memorabilia. “Each wall is coated, but it is not garish the way you’d think. People come in and say, ‘It’s so beautiful,”’ he states.

Here are some suggestions for working a few of Marilyn’s mystique into your own decor.

Millennium Cabinetry

There is something about Monroe’s image. Her life — both the good and poor — was well recorded during her career, together with photographs spanning a full assortment of emotions. Here a bright colour wash over a Monroe portrait provides artful drama into a space.

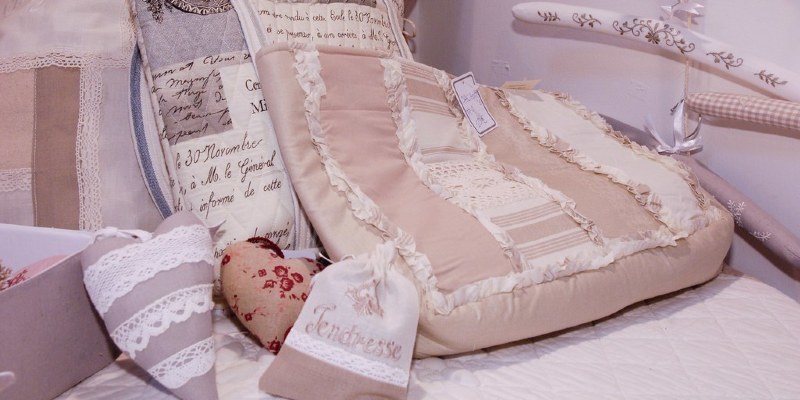
Schreiner has also curated an exhibition at The Hollywood Museum which will run from June 5 to September 8, 2013. It will exhibit a lot of his collected Monroe artifacts, such as dresses she wore in her movies and in life, in addition to her refrigerator and dresser (pictured); the dresser was next to her the night she died.

Envision living

Interestingly, while Monroe’s image offers pop art cachet, her elegant picture can anchor sophisticated settings, also.

Ilija Mirceski

“Marilyn has been an iconic figure for the entire world,” Schreiner says. “She is a star in every respect and keeps reinventing herself.” You would be hard pressed to find another face that could create drama and fashion in a large format the way Monroe’s does.

Envision living

Here a sexy wine-sipping Monore graces fabric for a headboard.

Beasley & Henley Interior Design

Monroe’s image adorns the backs of these jet-black chairs.

Lizette Marie Interior Design

“Equally, women and men are attracted to her, feel protective of her,” Schreiner says. “Women never felt threatened by her intelligence, classiness and voluptuousness.”

Design Manifest

“There is something hauntingly incredible about her on the display,” Schreiner says. “She is bewitching, luminous. You can’t take your eyes off her. No one on film has done that for me but her.”

West Chin Architects & Interior Designers

Monroe took a staggering amount of nude portraits during her lifetime, a rarity in those days — and not only for someone with such star power.

Here celebrity Bert Stern’s “Marilyn Monroe — Crucifix II (in The Last Sitting), 1962” hangs in this modern dining room space, creating a dramatic and provocative setting.

Kelly Hoppen London

Portraits: Michael Hoppen Gallery

Nieto Design Group

“Above all she reflects much we miss that we don’t have today; she had been the end of this Hollywood studio-system era,” Schreiner says. “After that the studios took away the magic of the celebrities.”

KellyBaron

Holly Phillips @ The English Room

Warhol’s take on Monroe’s image always offers a exploding colour palette to play from. “Her image has lasted because she practically was handsome art herself,” Schreiner says. “No wonder enormous artists like Andy Warhol and a thousand others were fascinated by her.”

Spinnaker Development

This is a super-rare Seward Johnson bronze sculpture depicting Monroe’s most famous moment: holding her dress when standing over a blowing subway grate.

Your turn: Show us your Marilyn Monroe decor!

See related