Fungus Gnats in a Greenhouse

Fungus gnats (Mycetophilidae and Sciaridae families) are unwelcome greenhouse visitors. Although gnats look like tiny mosquitoes, they do not bite or snack. Adult gnats are harmless, but their presence indicates the certainty of unseen seams that attack roots and compromise plant health. Although enclosed greenhouse environments pose challenges to controlling fungus gnats, early detection permits you to act swiftly before initial populations cause infestations.

Detection

Adult fungus gnats fly across potting soil that is high in organic matter, like peat moss, which can be a main part in many greenhouse soilless mixtures. You’re able to detect their presence almost immediately by mounting yellow sticky cards through your own greenhouse, which pull and trap gnats. The University of Connecticut proposes using one to four traps per 1,000 feet, put in a grid pattern, with extra cards attached near doors and ports. Potato slices pressed to potting mixtures around plants pull fungus gnat larvae. Checking the pieces weekly is a simple early-detection system.

Damage

Adult fungus gnats are irritation insects to people, but they do not damage plants. Female gnats lay eggs in potting soil that hatch into maggots, which are larval life stages of the insect. Larvae eat fungi, mulch and plant origins. The University of California warns that fungus gnat larvae can lead to serious damage in greenhouses. Since they feed on roots, they destroy a plant’s nutrient transfer system, which causes stunted growth, yellow leaves and, in serious cases, plant death.

Treatment

The most effective control is also the easiest. Fungus gnat larvae cannot reside in the absence of moisture. If you allow plant press to dry before watering again, larvae will perish. Pyrethroid-based insecticides kill adults but have no impact on larvae. Bacillus thuringiensis subsp. Israelensis (Bti) is a microbial insecticide that is applied to soil media as a drench. It is frequently tough to find in retail shops, but an option is imidacloprid, which is a systemic insecticide that is also applied to soil to control fungus gnat larvae.

Prevention

Preventing fungus gnats from populating your greenhouse is the best line of defense. All nursery pots, plug ins and seed flats ought to hold well-draining potting mixtures. If your irrigation or mist process is on a timer, make certain that it’s set properly so that you don’t over-water plants. Filling containers with pasteurized soil mixes and compost prevents the introduction of infested media to your greenhouse. Properly screened windows and ports disallow fungus gnats from coming inside.

See related

Bug Spray for Fig Trees

You can buy pesticide sprays for the two insects that many commonly mist fig trees, the driedfruit beetle and spider mites, and also the damaging earwig. In other cases you are able to control insects by spraying insects with horticultural oil or by introducing predatory insects, which you can purchase from garden supply centres.

Spray for Driedfruit Beetle

The driedfruit beetle (Caarpophilus hemipilus hemipterus), also referred to as the sap beetle, and several related species including the Freeman sap beetle (C. freeman) along with the confounded sap beetle (C. mutilates) commonly infest fig trees. These small brown or black beetles, from 1/10 into 1/5 inch long, sometimes have spots on their wings. They spoil the looks of figs, cause them to sour and make them appealing to other insects. The University of California’s Statewide Integrated Pest Management Program recommends putting bait traps in the region before the figs begin to ripen. After the trap count begins to drop, spray the trees with insecticide containing malathion at a solution of water and sugar in the rates specified by the manufacturer. Do not re-enter the place for 12 hours without protective clothing and do not harvest the figs for three days.

Sprays for Spider Mites

Meanwhile, the Pacific spider mite (Tetranychus pacificus) as well as the twospotted spider mite (Tetranychus urticae), both of which have yellow-green bodies with dark spots, suck the bottom of fig leaves, causing them to turn brown and drop. Commercially available insect predators including predaceous mites (Metaseilulus spp) and also sixpotted thrips (Scolothrips sexmaculatus) feed heavily on spider mites and might kill them all in a fig orchard. To smother the mites, spray fig trees with horticultural narrow-range oil combined with a pesticide containing the active ingredient bifenazate on trees that are not bearing figs. If you spray the trees with bifenazate you should not consume figs growing on these trees for one year.

Sprays for European Earwigs

The European earwig (Forficula auricularia) poses less danger to fig trees, but it might feed on the fruit. To control infestations, spray on the earwig with insecticides containing spinosad. It’s unlikely you will need stronger insecticides to control earwigs on figs, but if you do, then UC IPM recommends you spray them with insecticides containing carbaryl applied in accordance with manufacturer’s directions.

Insects Requiring Biological Control

The cream-colored larvae of the Navy worm (Prionoxystus robiniae) burrow under the bark of fig trees can encircle and kill fig tree limbs (See Reference 2). It is possible to recognize the 2-inch-long grubs from the sawdust and sap they excrete on the surface of the bark. There aren’t any pesticide sprays to combat carpenter worm larvae. You can control them with commercial formulas of the parasitic nematode, Steinernema feltiae, implemented in accordance with the provider’s instructions.

Insects without a Substance or Biological Control

There is absolutely no chemical or chemical control for the oval-shaped darkling ground beetle (Blapstinus fuliginosus) that feeds on figs. The dreary black beetle is all about 1/4 inch long, and its larvae feed on decaying organic matter on and in the dirt surrounding fig trees. Keep the ground clean beneath your trees and harvest the figs instantly.

See related

The way to Tell If Blown-in Cellulose Insulation is null Right

Cellulose insulation is just a loose-fill product made up of pulverized recycled paper treated with fire retardant. Unlike conventional fiberglass installed blankets called “batts,” cellulose is blown into attics and walls beneath air pressure through a hose. Cellulose offers a higher R-value — the measure of their capability to retard heat transfer — compared to fiberglass. Therefore, less thickness must produce the specified insulating value. Because cellulose is just a loose-fill material, it can easily be blown into odd-shaped spaces in a attic or wall, typically providing more complete coverage than fiberglass batts that require labor-intensive cutting and fitting to cover all of spaces. A typical installation is a two-person task demanding a blowing machine with a hopper to feed the cellulose, plus a 3-inch hose up to 200 feet in length to spread the insulation.

Are Air Leaks Sealed?

Proper installation starts before cellulose is added. While cellulose insulation retards heat transfer by conduction, it’s far less effect on heat transfer from direct air leaks. Sealing air leaks should be the first step of any professional cellulose installation. After cellulose is installed in an attic, air escapes covered by the insulating material may be difficult to detect. These unseen leaks will continue to allow air to flow into or from living spaces below, wasting energy.

Is It The Correct Depth After Settling?

Cellulose insulation installs as fluffy, aerated material that settles over the following weeks and months. The thickness required to accomplish the proper R-value is based on the settled thickness in inches. A professional installer will compute proper depth of cellulose insulation with the addition of no less than a 13 percent tolerance for settling. An installation that needs 12 inches of cellulose to achieve the desired R-value should have an initial installed thickness of approximately 14 inches to compensate for eventual settling.

Does this Cover Lights?

Cellulose insulation installed in the loft should not contact recessed ceiling lights unless the lights have the Underwriter’s Laboratory IC (insulation contact) rating. Depending on local building codes, before the cellulose is blown in an enclosure may be necessary above non-IC recessed lights to maintain insulation a minimum of three inches apart from the fixture. In certain places, cellulose cannot be added to an attic with non-IC lights under any condition, demanding replacement of light fixtures.

Is The Chimney Insulated?

No installed cellulose should get in touch with an uninsulated chimney that passes through the loft. Installers should maintain at least 2 inches of clearance between the insulation and the masonry of this chimney. Cellulose may be installed in direct contact with the chimney only if the chimney is wrapped with a mineral wool batt to insulate chimney heat.

Are The Wall Cavities Full?

Cellulose is blown into existing walls via holes bored into the wall cavity between studs, usually from the exterior of the home. Following the cellulose was installed, the holes are closed. Insulation sealed inside wall cavities could be evaluated by means of an HVAC technician using a thermographic camera that images heat transfer through the wall. Areas where the level of insulating material is missing or substandard appear to be red heat plumes on the imaging screen.

See related

The way to Make Wood Stud Walls Straight

Walls set living spaces, provide privacy and support the structure above, but getting them perfectly straight can be frustrating if you are not a seasoned carpenter. Standard wall-framing is not difficult, but because wood is a product of nature, no two studs are equal. By using the very same techniques the experts use, you can construct straight and even walls.

Choosing Studs

Everybody wants to go green, but when it comes to timber, green wood — newly milled lumber — usually contains more moisture than experienced wood. The greener the studs, the more inclined they are to warp or shrink as they dry, resulting in lumps and bumps in your wall. If you can, hand-pick your studs, then turning every single one on-edge and eyeballing down its length to check for warping. Pick the straightest studs you can find for your own walls. If you are building a partition wall which will not keep weight, you can use finger-jointed studs, which are created by laminating short lengths of timber together to form a straight stud that is prone to warp. Finger-jointed studs are not acceptable for load-bearing walls.

Framing

In new construction, most walls are framed on the ground, then raised and installed. For your straightest walls, position every stud with any overhead facing upward. The crown is the slight bow at the middle and every fireplace has just one, though some are far more pronounced than others. When attaching the wall studs to the top and bottom plates, lift the end of the wall fireplace only enough so the edge of the fireplace is flush with the edge of this plate. To frame an erect wall, face all of the stud crowns to a side and flush the edge of the studs to the edge of the plates to the same side before nailing the studs to the plates.

Plumb Walls

Whether you are framing the wall in place or on the ground, it has to become aligned and plumb. Now’s construction laser degrees simplify this job. Position the level at the edge of the ground plate and project the beam upward to make sure that the edge of the top plate is at vertical alignment prior to securing the upper plate. Laser levels can also be favorable for squaring the wall frame during installation.

Drywall Shims

If the plane of the wall is uneven, it is not always the fault of the timber studs. During drywall installation, the panels meet about the centers of wall studs. When the long edges of drywall panels, which are beveled, meet, the bevel offers an indention for applying joint compound and tape without bulging. The ends of drywall panels, however, do not have bevels and when two ends meet on a hammer, it results in a “butt joint” that can show after taping. To prevent this issue, staple drywall shims to the studs on either side of the bottom joint before attaching the panel. This makes a very minor indentation over the bottom joint which accommodates tape and chemical without showing a bump.

See related

House Plants That Clean Air With Little Sunshine

A lot of plants cultivated inside also replenish the air, filtering out pollutants and increasing the oxygen content in the building. Choosing widely available plants well suited to indoor lighting will help to make sure that every plant maintains its attractive look and achieves its full air-purifying potential.

Dracaena

A variety of species and cultivars of dracaena including the dragon tree (Dracaena marginata), “Janet Craig” dracaeana and “Warneck” dracaena can withstand low light and relatively dry air. Dracaenas are precious for their strap-like foliage, which is often variegated and shiny, and sometimes rises atop vertical stems. These plants can remove pollutants like benzene, formaldehyde and trichlorpethylene.

English Ivy

English ivy (Hedera helix) has a vining habit which makes it suitable for hanging baskets or indoor areas in which it can climb without damaging any underlying surface. This shade-tolerant plant removes benzene from the air, contains appealing, sometimes variegated leaves and prefers mild temperatures, suffering in warm areas of the home.

Golden Pothos

Golden pothos (Epipremnum aureum), or devil’s ivy, is among the easiest houseplants to cultivate successfully and rises relatively fast. This specimen features heart-shaped green leaves tinged with cream or gold which develop to a vining stem that is either allowed to hang or educated to climb. Golden pothos filters out formaldehyde and carbon monoxide.

Passion Lily

The peace lily (Spathiphyllum sp.) , sometimes also known as white flag, is among the few houseplants which will produce flowers in low light conditions while also filtering trichloroethylene and benzene from the air. The peace lily includes large, dark green leaves and attractive white spathes that appear above the foliage on stalks. Direct sunlight can burn peace lily leaves, which are broad and have a tendency to collect dust, requiring regular wiping.

Spider Plants

Spider plants (Chlorophytum comosum), sometimes called airplane plants, which are low-maintenance and perfect for use in hanging baskets. These plants have long, thin, arching and sometimes variegated leaves, and sometimes create small flowers on prolonged aerial runners. Spider plants can absorb chemicals like benzene, carbon monoxide, formaldehyde and xylene from the air. They are easy to spread with all the plantlets that readily appear at the end of aerial runners.

Added Houseplants

A handful of additional houseplants also purify the air, can survive in relatively low light and are readily available. Formaldehyde-removing philodendron, often mistaken for pothos, features comparable leaf along with a vining habit which allows the plant stems to hang down or climb when given adequate support. Lily turf, Kimberly queen fern, schefflera and diffenbachia are also valuable in low-light insides due to their varying skills to capture the common indoor air pollutants benzene, formaldehyde and trichloroethylene. Kimberly queen fern also improves air quality by releasing moisture to the air.

See related

Mothballs Produced on Apple or Peach Trees

Apple and peach trees would be the target of many damaging insects that may assault the trees and ruin the fruit. The use of synthetic or organic pesticides eliminates a breeding place and protects all trees in the area. But pesticides are registered with the Environmental Protection Agency in the USA. Using a registered pesticide in a manner not given on the label is illegal.

Common Pests

There are lots of common apple and peach tree pests that could be controlled with the right pesticides. Aphids, moths, worms, maggots and mites all assault apple trees in most areas. Peach trees are also attacked by borers, moths and tiny insects known as scales that sit down on leaves and stems. Applying pesticides for some of these pests begins before the leaf buds break and continues in various types up to 21 days before harvest.

Mothballs

Mothballs are made with registered pesticides, either napthalene or paradichlorobenzene. They evaporate to a poisonous gas that will kill moths and fabric-eating insects when concentrated in air-tight containers. The tag on mothballs specifies that they must only be used in tightly closed containers where people will not have permanent exposure. The limitations on the tag mean it is illegal to use mothballs outdoors in purple or apple trees, where they could contaminate soil and harm children interested in their scent and shape.

Paradichlorobenzene Flakes

Some pesticide products specified for peach tree borers do contain paradichlorobenzene flakes. These otherwise labeled products can be used to control insects in coral trees, but shouldn’t be substituted with mothballs. The crystals are applied to the ground around the back of this tree to fumigate the insects as soon as they have drilled to the tree. A constant circle of crystals across the back can be applied 2 inches wide and 1 inch away from the bark. A maximum of 6 tablespoons should be used on big trees, but only 1 or 2 tablespoons on a tree within its initial two years. The dirt where the crystals are applied should be eliminated after 3 weeks.

Pest Control

Regular spraying of apple and peach trees at the house garden is recommended. Complete management of diseases and insects requires as many as seven or eight distinct sprays at distinct stages of fruit and budding development. Preemptive action can be taken against insects like removing dead wood from the tree, clearing dropped or diseased fruit and thinning fruit therefore that adult fruit do not touch each other. Integrated responses such as introducing ladybugs can also assist. Non-toxic alternatives to controlling deer and mammal pests include tying little bars of soap produced of tallow around the tree or using mint oils mixed with garlic and pepper.

See related

How to Care for a Golden Privet

Golden privet (Ligustrum x vicaryi) deserves a high ranking on the list of attention-grabbing ornamentals. Hardy at U.S. Department of Agriculture plant hardiness zones 5 through 8, the 8- to 12-foot-tall, vase-shaped evergreen tree gold privet brightens sunny spots with its dense stems of golden-yellow leaves. The dramatic leaf highlights clusters of white, butterfly-attracting spring blooms and blue-black, summer berries. In mild-winter climates, gold privet retains its leaves all year. Its salt-tolerance makes the shrub a good choice for coastal gardens.

Water gold privet weekly or as soon as the top 3 inches of soil are dry. A gold privet along the cool, humid shore needs less watering than one at a warm waterfront atmosphere.

Feed gold privet in early spring, midsummer and early fall with a natural, slow-release 5-3-3 fertilizer. Sprinkle the fertilizer evenly over the root zone of the plant, beginning two inches from its trunk and extending just past its erect leaves. Apply the fertilizer at the rate specified on the tag for the size of the shrub. Water well to dissolve the food into the ground.

Watch the shrub for thrips, gold privet’s most serious insect pest. Measuring less than 1/20 inch long, the slender insects might be white, yellow, gray or black. Thrips larvae, or nymphs, resemble the adults except for their lack of fringed wings. These insects consume leaf tissue, leaving the leaf stippled and speckled with dark excrement. They usually infest new development. Remove light thrips infestations by blasting the insects with water from your garden hose. Spraying the shrub with narrow-range oil or insecticidal soap at the very first indication of damage additionally controls thrips. Always employ chemical sprays based on the manufacturer’s specifications.

Check regularly for dropping leaves or discolored blotches on the shrub’s older foliage, symptoms of leaf spot fungal infection. Golden privet tolerates mild leaf spot infection with no harm. Prevent the fungus from spreading, even if necessary, by spraying a contaminated tree using copper-based fungicide.

See related

Instructions for Paper Woven Chair Bottoms

Woven chair seats evoke pioneer times and state living, a time in which easy, homemade furnishings, fashioned from whatever was at hand, were life’s luxuries. Today, a woven chair seat is a lavish. That wrapped-around and crisscrossed web of grasses or rushes can be more expensive than the original chair. Thus, if your seat underside has seen a few too many seams, contemplate paper as the stealth choice to give the chair fresh life. Paper rush is fiber created from twisted strands of paper — cellulose with all the strength of a mighty tree — however a price tag almost as lightweight as tissue.

Pick the basic wrap-around weave for the first effort. Chair seat patterns are classic, whether you use reed, seagrass or paper rush. For a seat seat more rectangular than square, then adjust the design to cover the whole frame.

Start at the left front corner in front of you as you face the seat. Catch a 3- to 4-inch end dangling and wrap a ball above the front rail, around, under and over to the left rail, around and under. Run that strand throughout the front of the seat, next to the front rail, to this corner of the ideal rail.

Pull the ball above, around and below the ideal rail and upwards over also the front rail. Then run the strand along the ideal rail to the back rail and repeat the wrap pattern at the corner.

Continue around and about the seat seat framework, tightly packing the strands along with the flat end of a screwdriver to maintain the seat strong and snug.

Stuff crumpled paper or corrugated cardboard triangles into the space formed between the lower and upper strands. A tight weave doesn’t need this reinforcement, so it is generally a matter of personal preference.

Fill in the open middle section left when your seat isn’t square, as the shorter rails or side dowels are packed using strands and the more rails have a difference. Fix it by weaving a string of paper rush over a rail, to the middle of this gap, and below the perpendicular strands. Just take the active ball from the center to the opposite rail underneath up over that contrary rail back to the middle, and under the cross grasses to the first rail.

Keep running the ball above, under, around, above, etc. until the whole long rail of the seat frame is covered, and there’s a tight woven center to the seat seat. Tack, tie off or glue the raw ends of the grasses to the bottom side of the seat frame.

Be sure long life for all your hard work by painting or spraying the paper rush seat with a protective clear coat. Refresh this clear coat from time to time, depending on the amount of work with the seat gets, and also the seat may outlast the weaver.

See related

Colorful Quirkiness in an Irish Home

Joanne Kelly’s customers said from the beginning they wanted a unique and unique home — one which strayed far in the all-beige insides, leather sofas and bamboo furniture which has been common in their leafy Irish suburb. “They talked a lot about needing a home that felt creative and inspiring. Although their home blends nicely from the outside, it couldn’t be more different as soon as you walk through the door,” says Kelly.

But before getting to the interesting part of sourcing artwork, mixing old decor with fresh and swathing the walls with bold paint and wallpaper, Kelly faced the challenge of working around and retaining the existing kitchen cabinetry, bathroom tiles and flooring. “The style of the bathroom and kitchen tiles wouldn’t have been my first choice — nor my customers’,” Kelly says, “but we needed to follow their funding and work with what we needed.”

in a Glance
Who lives here: A professional couple in their early 30s
Location: County Kildare, Ireland
Size: 1,055 square feet

Believe Contemporary

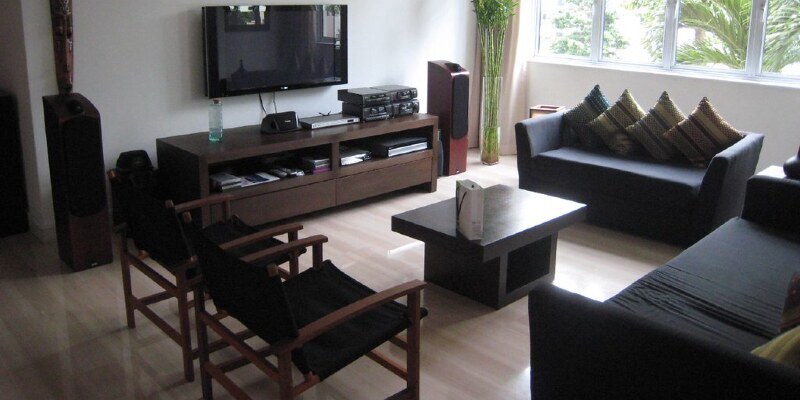
Many people state their kitchen works the hardest for their family. However, Kelly’s customers max out their streamlined living room’s flexibility. The space hosts get-togethers with buddies and sitcom watching about the laptop, and even offers his-and-hers reading nooks by each one of the two windows (one is pictured here with all the green arm chair and ottoman).

Believe Contemporary

The stairs, typically located in the very front of a home, run through the center of this one.

Kelly’s customers also work in style, and they love her whimsical take on the traditional coatrack. “A panel of cast iron hooks just wouldn’t work for them. They really wanted me to expand the quirk factor down to the last detail,” she says.

Runner: TC Matthews Carpets; coatrack: Swedese

Believe Contemporary

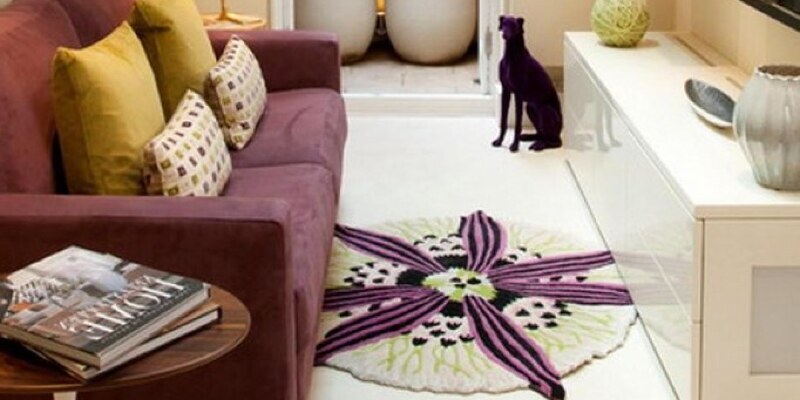
Lime-green vinyl wallpaper and a rug using protruding circular dots add feel to the living room.

Sofa, armchair: Duff Tisdall; java table: Home Couture; wallpaper: Siam, Casamance; artwork: “Pink Polish,” by Jasper Goodall, A New Space; carpeting: Toppissimo, Nani Marquina

Believe Contemporary

“I also love my client was so open to using very powerful colors and bold art in their primary living space. This is a supercozy area in winter, with its open fireplace, and relaxing and cool in the summertime,” says Kelly.

The next reading corner sits across from the principal sofa in a coveted spot between the fireplace and the window.

Believe Contemporary

The designer placed the quiet star of the room — a midcentury teak sideboard — by a Scandinavian chair and ottoman. “It’s such a typical piece, because typically sideboards from this era are a little deeper in color, and they do not have metal legs, and that’s what attracted me to it,” says Kelly.

Sideboard: Wild Child Originals; armchair, ottoman: Swedese; side table: Kartell

Believe Contemporary

Kelly tweaked the Shaker-style kitchen cabinetry by substituting the large wooden knobs with chrome pieces. The knobs and the stainless steel appliances — as well as the lime-green kitchen carpet which reproduces the retro color of the living room — lend the country-style kitchen a more contemporary look.

Dimensions: artificial stone

More about choosing hardware for Shaker cabinets

Believe Contemporary

Believe Contemporary

The home’s location, in a very suburban, family-oriented area of understated homes, pushed the designer and her customers to go bold with accent-wall colors and artwork. The customers’ very own collection of contemporary art and mixed media aided. This digital print of Charlie Chaplin using a graffiti background gives the room a lively edge.

Dining table chairs: Pedrali; tabletop: habit by Joanne Kelly; window remedies: Blind Style; pendant light: Secto Design; wall mounted paint: Pinot, Color Trend

Believe Contemporary

Kelly filled a lonely landing corner with an upcycled tallboy in the secondhand furniture store. A colleague stripped it down and refinished it, keeping the original handles and incorporating artwork she discovered on the internet to the drawers.

“It adds this element of surprise and makes turning that corner which much more fun,” says Kelly.

Believe Contemporary

Repeated prints of white feathers on a teal background take center stage from the master bedroom. “Normally clients need some convincing when it comes to really graphic, adventurous wallpaper. However, my customers were drawn to the wallpaper as soon as I revealed it to them,” says Kelly.

Wallpaper: Ferm Living; Chair: habit; sideboards: Ikea; pendant
light: Le Klint; carpeting: TC Matthews Carpets; bedside lamps: Business

Believe Contemporary

Personalized Ikea side tables using painted drawer fronts add cheerful citrine splashes.

Believe Contemporary

Believe Contemporary

A mirror doubles the impact of a bold wallpapered accent wall in the toilet, distracting in the older wall and floor tiles.

“My clients commute into town proper, so at the end of the day, they actually enjoy relaxing in the bathroom. I’m glad that we were able to revamp the room only with the addition of a wallpaper which adds a great deal of punch. And we remained within budget,” she says.

Wallpaper: Alice, Mini Moderns; wall paint: Chinese Slate, Color Trend; floor and wall tiles: existing

See related

Easy Green: Fire Up an Ecofriendly Barbecue

I can’t think of a far more enjoyable way to spend the afternoon than hanging out at the garden with a bunch of friends, cooking dinner on the grill. With garden barbecues often includes squander, and lots of it. From paper plates and cups to plastic utensils and food scraps, the normal garden grill-up can create an whole trash can full of waste. As grilling season kicks into high gear this summer, think about making some of these tiny changes to reduce the environmental impact of your next gathering.

Chicago Green Design Inc..

Swap your charcoal for propane or gas. Charcoal-fired grills give off substances that contribute to poor air quality, so try using a propane or gas-fueled model instead. I understand some die-hard charcoal fans will not need to give up this characteristic smoky taste, but gas grills can’t be beat in terms of convenience.

Grills Direct

Element Grill – $489.98

Update your small-space grill. If you thought your only option for grilling to a tiny terrace was among those tailgating-style charcoal grills, you haven’t seen this sleek number from Fuego. Lean enough to tuck in the tightest place, this propane-fueled grill is incredibly effective because of its size, handling everything from steaks to pizza with ease.

Brookstone

Stainless Steel Charcoal Grill Starter – $84.99

Step away from the lighter fluid. If you do use a charcoal grill, then there are a few simple changes you can make to “green” your own grill. First, prevent dousing your barbecue lighter fluid, which releases VOCs into the atmosphere; try using a starter like the one shown here instead. Second, look for “lump charcoal” rather than briquettes, which can contain coal dust and chemical fillers.

Stephmodo

Mason Jar Mugs – $24

Add a little bit of old-fashioned charm. There’s something so appealing about drinking out of mason jars in the summer, and reusable eyeglasses are a far sounder choice for the surroundings compared to throwaway plastic cups. Try out this pair of mason jar cups or pops up a flat of the actual deal next time you’re at the supermarket — they are so reasonably priced, you can afford to stock up.

The Curiosity Shoppe

Portland Picnic Plates – $32

Use unbreakable plates. Having a pair of dedicated outdoor dishes is a worthwhile investment — utilize them at backyard barbecues, bring them along on picnics and take them camping too. I love this cheerful gingham print set in The Curiosity Shoppe.

Terrain

Picnic Napkin – $18

Use actual napkins. It is not much trouble to throw a load of linens in the wash after a party, so why not use the real stuff instead of paper to your get-together? These linen “Eat” napkins from Terrain are a cute choice. If you’re the crafty type, then you can try a DIY version with a little bit of fabric paint and some alphabet stencils.

Farmhouse Wares

Galvanized Tin Caddy – $46.95

Take your flatware to proceed. Whether you dedicate a place to outdoor dining or transport your indoor flatware outside, a flatware holder like this rustic galvanized version from Farmhouse Wares is a excellent way to keep things clean.

greenfeet.com

Disposable Bamboo Utensil Set – $8.49

Go biodegradable. If you would like the ease of disposables but nevertheless possess a conscience, then choose biodegradable utensils like this bamboo flatware. Bonus: You can in fact reuse these several instances, to make them go somewhat further.

Branch

Maru by Wasara Dinnerware – $8

Take a step up from traditional paper. These plates are shrub totally free, and you will throw them into your compost bin when you’re finished. Reusable plates are greatest, but at a pinch these are a great option.

Joanne Hudson Basics

MYdrap Mustard Cotton Cocktail Napkin Rolls – $26

Reuse, recycle or compost these napkins. MYdrap makes unique reusable cotton napkins that arrive in a roster like paper towels. The difference is that they come in fun colors, and if they begin to wear out, you are able to recycle or compost them.

Clarke Appliance Showrooms

Green up your own menu. Hormone-free meat, grass-fed beef, sustainable fish and local organic produce are the top picks to get a green feast.

At West End

Recycled Recycling Bags – $30

Make recycling easy for guests. Set out clearly marked bins within an easy-to-access location before the party to make sure that all those cans and bottles make it into the proper place.

Hayneedle

Exaco Compost Bin With Aerator – $519.99

Do not let those food scraps go to waste. If you compost, allow your guests know they can scape their dishes into a bin to get the compost rather than chucking food into the trash. Not Heard nonetheless? Think about trying it out this season; it will provide you a place to throw your kitchen and yard waste, and will reward you with “black gold” — nutrient-rich compost to your garden.

Urrutia Design

Involve your friends. Let your guests understand the motives behind the changes you’re making. You could inspire among your family or friends to begin producing green changes of their own!

See related